CP-Setup Guide


|
CP-Setup Guide |
|
|
The CP-Setup Guide makes sure that the system is properly configured in order to run smoothly. After a successful CP-Server installation, the CP-Setup Guide will start automatically and take you through each step.
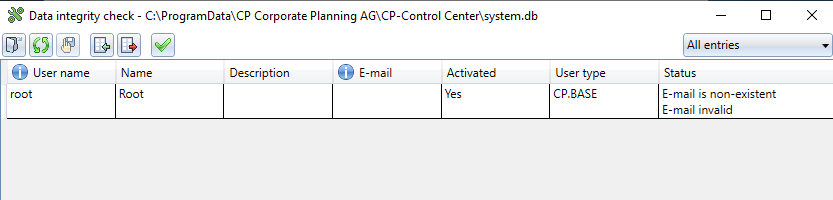
With the data integrity check, you can prepare the existing CP-Suite users for migration to CP-Identity Management. The migration of the users will follow in the "CP-Identity Migration" step. Click "Start data integrity check...".
This displays a list of all the existing CP-Suite users that have not yet been migrated (system.db). The "Status" column lists the required information that is missing for each user. When the non-existent or invalid user information has been entered, the status is updated automatically.
When the status of all users to be migrated is "valid", save the settings via the menu bar and close the dialogue.
In the toolbar, the following functions are available:
You will need a valid, activated licence. You should have received your licence file by e-mail from Corporate Planning Order Processing. If you have any queries, please contact our Support. If there is no activated licence, click "Activate licence". This opens the CP-Licence Manager to read in and activate the licence file (see Licensing).
If you installed CP-Server as a service, you can now enter the service login details. To select a user from the list of available users, click the (...) button. Enter the password for that user.
In the next step, set the paths for communication between CP-Server and the SQL Server. The backup directory is for manual data backups by the user. The exchange directory contains temporary files. The CP-Server and the SQL Server must have read and write permissions to these directories. If you specify a directory which does not yet exist, this will be created automatically when you go to the next step.
If the CP-Server and the SQL Server are both installed on the same computer, the paths for "SQL Server" and "Local" for the backup and exchange directory can both refer to the same local directory. Otherwise, network shares must be created on the SQL Server. For "SQL Server", enter the local path to the network share. For "Local", enter the UNC path to the network share.
In this step, you can enter the details for connecting to the SQL Server. The service user is used for authentication by default.
Alternatively, you can configure a custom SQL server authentication. Select "Microsoft SQL Server authentication" and then enter the access data.
In this step, the host and open port settings for the web module, CP-Identity Management, CP-User Manager, CP-Automation and the CP-Dashboard are checked. If the port verification fails because there are conflicts, you can enter alternative ports here. If desired, the FQDN can be determined for all connections.
If you change the settings for "CP-Identity Management host" or "CP-User Manager host", you will also need to update them manually in the configuration file for the CP-Client login (login.json) and in the certificates.
If you enable the auditing function, you can keep a record of all the alterations that are made in the CP-Control Center. Specify a Microsoft SQL Server on which the database for recording the audit events should be saved. If you do not select the "Microsoft SQL Server authentication" option, the CP-Server login details will be used.
Select the "Recording of the auditing events with the external CP-Log service" option if you wish to use a separate log service outside the CP-Suite. You may need to specify a separate user account in this case.
Secure access to the application server For secure communication with the application server (CP-Server), you can create a new certificate or add an existing certificate. The thumbprint is entered in the application server configuration (CP-Config) automatically.
The CP-Identity Management Server configuration is divided into the following sections:
SMTP For the CP-Identity Management functionality, an SMTP server is required. You can use an e-mail server configured by Corporate Planning, if you wish. You cannot configure this server. Alternatively, you can configure your own SMTP server. Enter the required data for connecting to your SMTP server. All administrative messages, such as changes to the SMTP settings, failed e-mail deliveries, etc. are sent to the "sender's e-mail address" specified here.
Admin When you have successfully configured the SMTP server settings, you can create a CP-Identity Management Server administrator. If an administrator has already been created, this section will not be displayed.
Login Define the administrator's CP-Identity Management Server login here.
Security If you select "Encrypt configuration", the configuration files of the CP-Identity Management Server and the CP-User Manager, as well as the content of the CP-Identity Management Server database, will be encrypted. Specify a password and then click "Save password".
Login policies Define the login policies for all users of the displayed tenant.
Password policies Define the password policies for all users of the displayed tenant.
To migrate the users from the CP-Suite (system.db) to CP-Identity Management, select the desired users and then click "Next".
If you selected the Qlik Sense Server feature in the CP-Server installation, the CP-Setup Guide will take you through the configuration of the Qlik Sense Server. The certificate settings and Qlik Server addresses specified during the Qlik installation will be displayed.
Installing the Qlik licence Qlik is licensed using a control number and serial number or with a signed key. During the integrity check that follows, the Qlik auto-configuration will be carried out with the data you have entered and the values will be transferred to CP-Config.
If you use Microsoft Power BI and wish to access your content via the Web Client, you will need to configure the connection to Microsoft Power BI. Configure your access via a service user or a user login and enter the required parameters. When you have entered all the required parameters, you can test the connection to Microsoft Power BI.
Finally, the CP-Setup Guide verifies all your settings. If one of the checks fails, this will be indicated by an error symbol. The "Configure" link takes you straight to the relevant step so that you can review the settings.
You can repeat the tests whenever you wish by clicking "Restart tests". If you would like the CP-Server to start automatically when the CP-Setup Guide has finished, select "Start CP-Server after completion".
Starting the CP-Setup Guide manually You can start the CP-Setup Guide whenever you wish. You will find it in the Windows Start menu à All Programs à Corporate Planning à CP-Server à Configuration check or Configuration help. Configuration check reviews all the settings automatically, and Configuration help lets you review and alter the settings manually.
|